
Why should an author blog include stuff about cooking?
I know what you’re thinking. Who care’s what a fiction author is fixing for dinner? Well, I believe one reason people might come here to get to know the author as a person. I know that there’s a difference–a gap–between the author and the work, but I also know that my life experience informs what I write. Part of my daily life experience involves new adventures in the kitchen, so this is a chance for readers to see this side of me.
I hope to include at least one kitchen adventure every week. Even if there’s not much interest in this, it sounds like a fun thing to do, so I expect to stick with this for a few months at least.
This week’s dinner
Jump to Recipe- Sous Vide Pork chops
- Pan Sauce
- Blackberry Sauce
Su Vide Chops
 For the uninitiated, sous vide means cooking in a water bath at a controlled, constant temperature. You put what you want to cook in a sealed plastic bag, dunk it in the bath, and leave it there for a couple of hours or so. For pork chops, for example, a water bath of 135 degrees Fahrenheit for two hours gives meat that’s cooked evenly all the way through, tender and juicy. It’s basically fool-proof, with no risk of the chops turning to dried-out, tasteless shoe leather.
It’s not totally fool-proof, of course. If you leave chops in the bath longer than four hours, the meat fibers will release most of their moisture, come apart, and get mushy. But that’s a two hour window, unlike the the seconds it takes to ruin chops when grilling, pan-frying, or baking in the oven. Sous vide is as close to fool-proof as you can get.
We’d already invested in a gizmo to vacuum seal food for freezing. With this handy doo-dad, you slip your food in a plastic bag and it sucks all the air out and then seals the bag closed. That helps prevent freezer burn and makes your frozen food last longer. It also creates the perfect container for sous vide cooking. You don’t have to have one of these devices, but it makes sous vide cooking even easier.
Once your chops–or whatever your cooking sous vide–are done, remove them from the plastic bag and dry them off. Even though the bag is sealed, in the hot water bath, water will seep through the plastic and get on your food. Since the next step is to sear the chops, you need to be sure they are dry.
You might be asking yourself why the “next step” is to sear the chops. I can hear you thinking, They’re already cooked. I just checked, and that’s what you said a couple of paragraphs ago.
It’s true, they are already cooked. But one of the things that makes meat taste good comes from searing the outer layer at a high temperature. This searing creates a Mailard Reaction, a chemical reaction between the natural sugars and proteins in the meat and gives it a brown texture. This “browning” step is essential to give the chop it’s final, flavorful taste.
I added herbs and spices after the sous vide bath. Some cooks recommend adding them to bag with the meat before cooking, and use the sous vide bath to infuse the flavors. I’ve tried this with fresh thyme and rosemary, but didn’t notice that it added flavors to the meat. It did add gloppy cooked herbs I had to dispose of before searing. It does seem to work if you rub some brown sugar and coriander on the meat prior to sealing in the sous vide bag, although tonight I waited to add these until right before searing the chops.
So, once you’ve got the chops out of their plastic bag, cooked through and through, and dried off, you put a couple of tablespoons of butter in a skillet and bring it to medium-high heat. This is also the time to rub your meat with herbs and spices. I used fresh thyme, ground coriander, ground ginger, and a touch of brown sugar. I also added minced garlic to skillet right before the chops. Anyway, stick the chops in the hot skillet for about a minute on each side, and they’ll be done to perfection. Just be sure the skillet is hot–give it a two or three minutes on the burner before you add the butter.
Pan Sauce
You’ll also be able create pan sauces with the juices and brown bits that wind up in the skillet. Once the chops are browned and out of the skillet, you can add chopped onions or shallots to the pan, a touch of olive oil, and then, after the onions are soft, de-glaze the pan with wine, Add some broth, herbs, garlic, mushrooms, maybe a touch of corn starch for thickening, and finish with more butter, and you’ve got a pan sauce. I used the pan sauce to top the Brussel’s sprouts I roasted in the oven, but you could use it as topping for the chops.
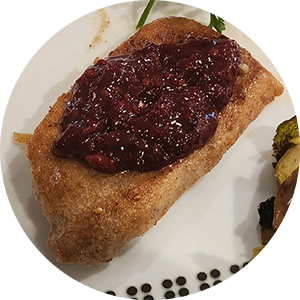
Blackberry Sauce
Yesterday, the grocery store had fresh blackberries on sale, and they looked so good I bought some. Now all I needed was to find a use for them. Impulse shopping has its downsides. I decided to fix a blackberry sauce for the pork chops. I found several recipes on the web, but constructed my own by smooching a few of them together. My idea was to get a sweet and savory sauce, kind of like a honey mustard pan sauce that’s a favorite of ours.
For the blackberry sauce, I used a basic recipe for a sauce you might use with pancakes or a dessert like cheesecake, and intended to add a touch of dijon mustard at the end. It turned out to not need it, so I left it out.
Take-aways
All right, so what have you learned so far? Well, you’ve learned that I’m a geek who likes gizmos, and who likes sciency-stuff when cooking, even if it does lead me to France and snooty French cooks. In fact, on my trips to France I’ve found that the myth of the snooty Frenchman is exactly that–a myth. Everyone I met while in France was warm and friendly, if a bit amused by my American walk and confused expression. Myth-busing is another favorite pastime.
Oh, and maybe you learned something about sous vide cooking. You’ve also learned I tend to lecture, er, I mean ramble.
For the rest of the meal, I roasted Brussels sprouts and topped them with the pan sauce I mentioned above.
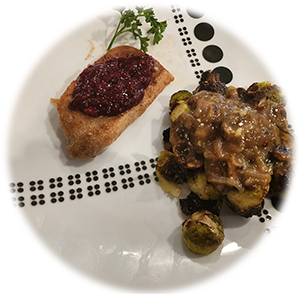 Overall, this was a pretty easy meal. For cleanup, I had the skillet used to sear the chops and the saucepan used to make the blackberry sauce. I used a silicone cookie mat to line the cooking sheet that I used to roast the Brussels sprouts, so I only had to rinse that off–no real cleanup. Prep time was pretty minimal too. Maybe five minutes to trim and halve the Brussels sprouts. Cooking time added maybe fifteen minutes, most of it waiting for the sauces to thicken. I baked the sprouts while I seared the chops and made the pan sauce. We usually have a fruit salad with our meals, so add another ten minutes to cut up the fresh fruit–in this case, watermelon, strawberries, a pear, and a banana.
Ingredients
Equipment
Method
- Place water in your tank and set your sous vide cooker to 135 degrees F for medium chops. I don't recommend higher settings. You can cook at 130 F for medium rare chops if that's your preference. See note below on food safety.
- Combine the herbs and spices in a small bowl.
- Lightly salt the chops on both sides
- Rub the chops all over with the spice mixture, massaging it into the meat
- Seal chops in separate plastic bags. You can use ordinary baggies for this step, but then you'll need to hang them from clips so less water seeps into the bag during the cooking process. If you have a vacuum sealer, you can just put the bags in water.
- You don't have to wait for the bath to reach temperature–you can just put the chops in right away. But be sure to get 90 minutes at full temperature.
Notes
Ingredients
Equipment
Method
- The idea for a pan sauce is that you have already seared your meat in the skillet, leaving behind juices and brown bits. Now, with your skillet under medium heat, add the shallots and olive oil. If lots of pan juices are in the skillet, skip the olive oil. You might even need to drain some of the juices, but be sure to keep the brown bits. You just need enough to cook the shallots without burning them.
- Stir and sweat the shallots for 3-4 minutes while they soften
- Add the minced garlic and stir until it's fragrant–not more than 30 seconds or so
- Add sliced mushrooms and cook until brown and they've lost most of their moisture
- De-glaze the pan with the wine. Use a wooden spoon to scrape up the brown bits left over from browning the meat. They will dissolve in the wine and shallot mixture. The pan will sizzle when you add the wine! Fun!
- Now add the chicken broth, brandy, and whatever herbs you are using.
- For a thicker sauce, make the corn starch slurry and add to the mix. With the corn starch, it should begin to thicken almost at once. Without, it takes a few minutes longer and is generally less thick.
- Once thickened (with our without corn starch slurry), remove from heat and stir in butter. If your're adding mustard, this is the time to do it. The sauce thickens further as it cools, which is why the corn starch is only needed if you want a more gravy-like sauce.
Notes
Ingredients
Equipment
Method
- Add blackberries, sugar, chopped rosemary, brandy, and lemon zest and juice to sauce pan and bring to medium heat.
- Cook until it comes to a boil, stirring frequently. Boil for about ten minutes, until fruit breaks apart.
- Make a slurry of the water and corn starch and add to the boiling mixture.
- Continue at low boil until thickened–it should thicken almost at once.
- Once thickened, remove from heat. Refrigerate if you don't use it once. It should keep a couple of days at least.
Sounds positively wonderful.
I will definitely be trying that blackberry sauce, as long as I can refrain from eating them first!
Great post. Thanks for sharing your recipes!
Thank for sharing these great recipes!