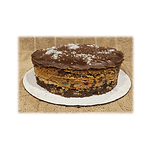
Four Layer Brownies
Assembling the layers
Equipment
- 1 Adjustable cake ring mold, with collar and acetate sheet
Materials
- 1 Brown sugar brownies, cooled
- 1 small bowl Peanut butter frosting
- 1 Peanut butter brownies, cooled
- 1 bowl Chocolate Ganache (prepared during this step)
- Flake salt for garnish (optional)
Instructions
- Don't fix the chocolate ganache until you've done the first seven steps.
- Place the brown sugar brownies on a ten-inch, round cake board or on a round serving platter.
- Frost the top only of the brownies, leaving about a quarter inch at the edge unfrosted.
- Center the peanut butter brownies on top of the frosted brown sugar brownies layer.
- Adjust your cake mold so it's about 8.5" in diameter. You're going to use the mold to cut through the two brownie layers and trim off the edges where the heat from the pan has browned them. This will expose the cake-like brownie underneath.
- Center the mold on top of the brownies. Be sure it's centered! Gently press down, cutting through the brownie layers. If the edge of the brownies are too crisp to cut through, adjust your mold's diameter. You can also use a paring knife to help make the cut. You want to cleanly cut through the browies without collapsing them, so slow and gentle is the way to go.
- Discard the edge browned edge portions that you just cut off--or save them. They make delicious toppings for ice cream!
- Now you're ready to make the ganache.
- ...ten minutes later...OK, you're ganache is now mixed and resting for fifteen minutes, so go back to the brownies. Expand the mold and lift it off the layers. You'll see the two brownie layers nicely displayed. We're going to want to preserve that for the presentation, so the next step is to trim a sheet of acetate so it will wrap around the brownie layers with an inch or two of overlap.
- Put the trimmed lucite inside the expanded mold and slip both over the brownie layers. Once in place, tighten the mold back up. The acetate won't stick to the layers, but it will keep the ganache from leaking and covering up the layers that we just exposed.
- You've probably still got ten minutes of wait time on the ganache at this point, so have a cup of coffee. In any case, once the ganache is sufficiently set up. pour it on top of the peanut butter brownie layer. If needed, smooth it out with a spatula.
- Now place the whole assembly in the refrigerator for at least thirty minutes--an hour is better. You want the ganache to set up, so when you remove the mold, it doesn't drip down the sides.
- I sprinkled flake salt on the ganache at this point. It gives it a nice look, and the extra salt adds some flavor. I suppose you could dust if with coconut flakes, too, if you like those dreadful things. The taste and texture of coconut makes me gag.
- ...thirty minutes later...Expand the mold and lift it off the serving platter, then peal the acetate away from the brownies and ganache. If you've waited long enough, the ganache will have a nice edge and consitute a visible top layer to your desert.
Notes
This is the process that produced the dessert in the picture.
You can see the Reese's Pieces and M&Ms showing in the layers. I liked the idea of putting peanut butter flavor in the brownie layer and chocolate in the peanut butter layer, but didn't like the way the candies got exposed--I thought it detracted from the overall effect.
In retrospect, I think I might have used peanuts instead of candy in the brownie layer and chocolate chips in the peanut butter layer for a better visual effect.
